Google Chrome is one of the most used web browsers for so many reasons, and extensions are one of those. Ever since I started using Google Chrome, I have been using so many useful extensions built by some amazing people.
I always wanted to explore how these extensions are built and distributed. So recently, I decided to give it a shot and learn the basics. I wanted to practice what I learn, so I thought of a simple idea and started building a tiny extension.
I thought of a personal reminder extension that displays a notification based on the selected configuration. I've named it Aqua Buddy because it reminds me of drinking water. Let's go step by step and build it together 🙌🏼
Getting Started
At the core, Google Chrome Extensions are nothing but a combination of HTML, CSS, and JavaScript code organized in a specific pattern.
An extension starts with a JSON-formatted manifest file called manifest.json file, that contains all the meta data about your extension, for example, name, description, and version of the extension that is displayed on the Chrome Web Store and when the extension is installed.
The
manifest.jsonfile should be placed at the root of the extension directory that contains the final distributable code.
Let's create an empty directory for your extension and create the manifest.json file with the following content.
{
  "name": "Aqua Buddy",
  "version": "1.0",
  "description": "I'm your friend 💙 and I'm here to help you stay hydrated!",
  "manifest_version": 2
}
Please note that
manifest_versionmust have a value 2, because version 1 has been deprecated since Chrome 18.
With only the manifest file in place, you can load it in the Chrome browser. Of course it won't have any interface or any functionality, but it will be listed in the extensions area. Please follow these steps to load your empty extension.
- Navigate to
chrome://extensionsOR open theExtensionspage using theSettings -> More Tools -> Extensionsmenu. - Once you're there, enable the
Developer modeusing the toggle button thetop rightcorner. - Once you enable the
Developer mode, you'll see a few buttons on the top. Click the button calledLoad unpacked. - It will open a directory selection dialog
- Navigate to your extension directory that contains the manifest file and select that directory.
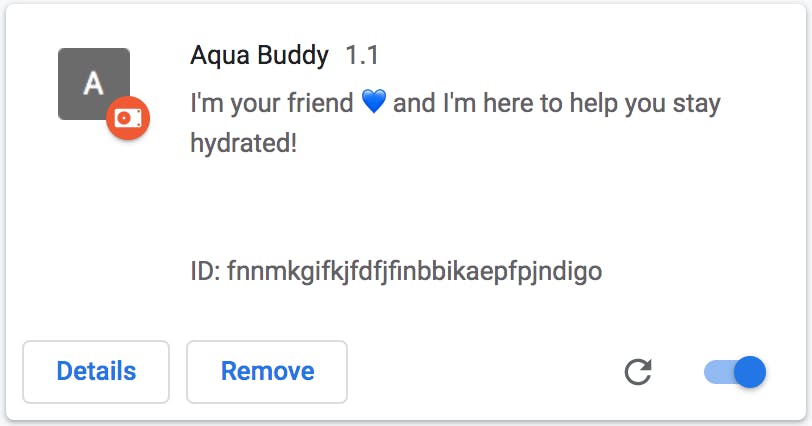
- You will see your extension being listed with the name, description and version you provided, like below.

Congratulations!!! You have completed your first step, let's make it look beautiful.
Adding Icons
To distinguish and identify your extension visually, you will need icons. If you have an icon set, it's great, otherwise you can find icons from the tons of freely available resources. One of many resources is flaticon, which has a huge collection of beautiful icons. For your extension, you will need following dimensions:
- 16x16 => This will be used as
faviconfor your extension - 32x32 => This is often needed for Windows computers
- 48x48 => This will be used on the extensions management page
- 128x128 => This will be displayed on installation and in the Chrome Web Store
If you're using a free icon set, please make sure to give credit to the creator as a goodwill gesture. Please note that some websites make it mandatory in order to allow you to use free resources.
After downloading the icons, place them inside a sub-directory that lives next to your manifest file, and update your manifest file like below.
{
  ...
  "icons": {
    "16": "images/aqua-buddy-16.png",
    "32": "images/aqua-buddy-32.png",
    "48": "images/aqua-buddy-48.png",
    "128": "images/aqua-buddy-128.png"
  }
}
Go to the extensions management page, locate the card for your extension and click the Reload button, and you will see the icon being displayed. These icons are used for the extension management page, the permissions warning, and favicon.
At this point, you will see that the extension icon is greyed out because we haven't added any functionality or user interface to the extension.
Cool, let's get to real work now by adding some visual elements.
User Interface
The extension user interface should be purposeful and minimal.
Chrome extensions support multiple types of interfaces and UI features listed below, some of which are required and some are optional.
Browser Action
This is the most commonly used configuration, when your extension is supposed to be working in most cases. Let's register the browser_action field in the manifest file.
{
  ...
  "browser_action": {
  }
}
By adding this, the extension icon will be colorized, which means the extension is available for use, but it doesn't do anything yet.
Page Action
Use this configuration if your extension should be available on certain pages based on some logic. The extension icon will be colorized only when it is available for use, otherwise it will be greyed out.
To define the rules that enable or disable the extension, you will have to use the declarativeContent API.
We don't need any page specific logic in our extension, so we will use "browser_action" configuration.
Icons
If you want to display a different icon in the toolbar, you can register it in the manifest file using the default_icon field in the browser_action or page_action section based on your set up. If this icon is not provided, Chrome will use the icon you provided in the icons section in the manifest file. If that is also not present, Chrome will use a default icon.
Recommendation is to use square png images and provide at least 16x16 and 32x32 sizes.
For this example, we will use the same icon that we have used in the icons section, so our updated manifest file looks like this:
{
  ...
  "browser_action": {
    "default_icon": {
      "16": "images/aqua-buddy-16.png",
      "24": "images/aqua-buddy-24.png",
      "32": "images/aqua-buddy-32.png",
      "64": "images/aqua-buddy-64.png",
      "128": "images/aqua-buddy-128.png",
      "256": "images/aqua-buddy-256.png",
      "512": "images/aqua-buddy-512.png"
    }
  }
}
Great, now our basic set up is completed. Let's get to implement the main functionality of our extension.
There are a number of UI features available to use, which are listed at the end of this article, but we will be using a Popup that will be shown when the users will click the browser icon.
Popup Template
We will create a file called popup.html in the root folder, with these contents.
I have included a trimmed down version of Tailwind CSS and some custom CSS in the ./css/aqua-buddy.min.css file.
This template means nothing until we link it with the extension. So let's get back to our manifest.json file and link it under the browser_action section like this:
{
  ...
  "browser_action": {
    "default_title": "Aqua Buddy",
    "default_popup": "popup.html",
    ...
  },
  ...
}
You might have noticed
default_titlebeing added along withdefault_popupentry. It will simply show a Tooltip when you hover over the extension icon.
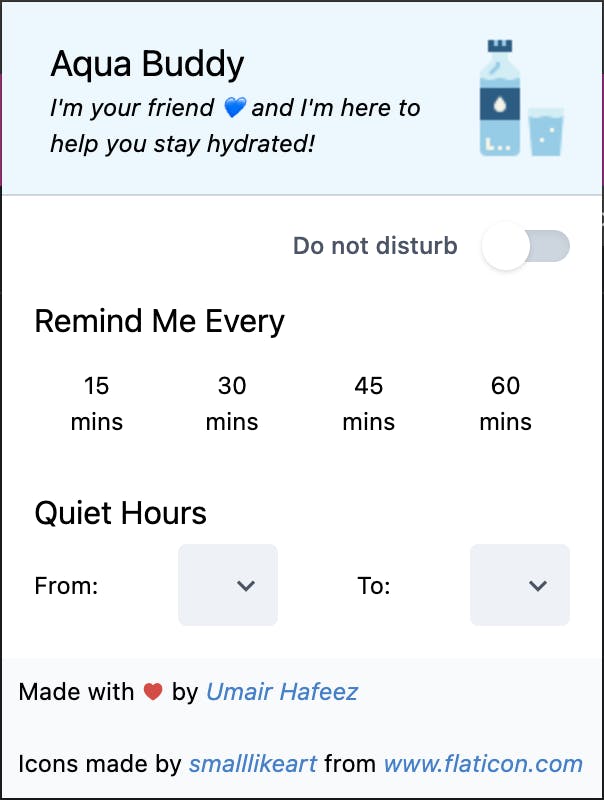
Once that is done, if we refresh the extension and click the extension icon, this is how it will look like.

Hoooray!!!
Now that we have the template ready, we need some JavaScript magic to make it work and show us those helpful notifications.
Extension Script
The Chrome extension need to know what events it should be listening to, for example, when the extension is installed or a change in storage or events emitted by other APIs. Such scripts have to be kept in separate files and registered under background section of the manifest.json file, like this:
{
  ...
  "background": {
    "scripts": ["background.js"],
    "persistent": false
  },
  ...
}
You can register multiple background scripts to modularize your code. The persistent property should be kept "false" according to the official docs.
Once these scripts are registered, the extension scans it for all registered events in these scripts.
As we are building an extension for notifications based on user's selected configurations, we will need access to:
- notifications API to show the notifications
- alarms API to trigger notifications based on the user's configuration
- storage API to preserve user's configurations
To consume these APIs, we will have to request permissions from the browser. The permissions can be registered in the manifest.json file like this:
{
  ...
  "permissions": ["alarms", "notifications", "storage"],
  ...
}
Let's create a file named background.js and put these contents in that file.
Please note that the API events need to be registered on the global level, without nesting inside any method, otherwise the events don't work as expected.
You can see that we have 3 event handlers registered at the end of our background.js file, which call further methods declared above. I have tried to keep the method names self explanatory.
You might have noticed that we are linking a file
popup.jsin ourpopup.htmlfile, which is to handle the popup logic.
Popup Script
As per official documentation, a popup is just another web page but it does not allow inline scripts. So how can we handle events from our UI elements like buttons or dropdowns?
We can use DOM API to listen to page events and register events for UI elements as well. For example:
document.addEventListener('DOMContentLoaded', function () {
  // This is where we can register and handle the page events and implement other logic
});
Let's add these contents to our popup.js file.
Please note that we are registering all the events every time the popup is loaded, because Chrome destroys the popup and the linked files once it is closed.
Refresh the extension, and ta-da, you have a working Chrome Extension!!!
Packaging for Deployment
To get your extension published on to Chrome Web Store, you will have to put all the contents including images & icons in a zip file. You can use any JavaScript package to minify your HTML, CSS and JavaScript files before creating the zip file.
Deploying the extension
To make your extension available in the Chrome Web Store, you need to register as a Chrome Web Store Developer.
Once you have the account created, you can visit the Developer Dashboard and click the New Item button.
You will see a popup, where you will be asked to upload the zip file you just created. After uploading the file, you will be taken to details section where you will be asked to provide a bunch of information about your extension including justifications of the permissions your requested in the manifest.json file, a bunch of declarations based on what type of data your extension will consume, and the regions you want to choose for distribution.
After filling all the required information, you can finally submit the extension for automated review process. As soon as the review is complete, the extension will be published on the Chrome Web Store.
Sometimes, manual review might be needed based on the permissions and the implementation of the extension, which will increase the review times.
Your extension will be listed on the Developer Dashboard and the status will be changed once it is published publicly.
Maintenance
Once your extension is published, you might want to check the statistics like number of downloads and ratings by the users. You can do that by clicking on the extension from the Developer Dashboard and clicking on the Stats and Ratings options in the left side menu.
You might also want to add new features and make it more beneficial for the users.
The good news is that you can do it as many times as you want, by following these steps:
- Update the extension code
- Update the
versionin themanifest.jsonfile - Create the zip file from the final code
- Go to extension details page by clicking on the extension in the Developer Dashboard page
- Click on
Packageoption in the left side menu - Click on
Upload new packagebutton in the top right corner - Upload the new zip file
- Optionally update the other information if required
- Click
Submit for reviewin the top right corner
And that is all!!!
Other UI Features
Popup (Docs): This is the UI that is displayed when you click an extension's icon in the toolbar. It is nothing but an HTML page with links to stylesheets and script files. The only difference is that it does not allow inline JavaScript.
Tooltip (Docs): A tooltip is displayed to the users when they hover over the browser icon. Tooltips can be registered in the manifest file as
default_titleunder thebrowser_actionorpage_actionsection based on your set up.Omnibox (Docs): The Chrome's address bar is called
omnibox, which provides an API to let the user interact with your extension directly through theomnibox, based on the registered keyword. The following is an example of YouTube's omnibox implementation.
Context Menu: (Docs): You can use the
chrome.contextMenusAPI to add items to Chrome's context menu. You will have to addcontextMenusto the permissions section in themanifestfile.Commands: (Docs): You can define commands in bind them to different key combinations. There is a section for
commandsin themanifestfile, where you can define all your commands and the respective key combinations.Override Pages: (Docs): You can create an extension to override and replace History, New Tab or Bookmarks web page with your own custom web page. A very common example these days is the New Tab page by daily.dev.
Conclusion
You might feel overwhelmed with a lot of information, but I tried to gather as much information here as I can, because the official documentation is pretty scattered at the moment.
I really hope you will like it and add a little value to your learning.
Please feel free to share you feedback in the comments, especially if you feel if I missed something or if something needs improvement.
Also, don't forget to download and install this tiny little extension that will help you stay hydrated 🙌🏻
Happy learning!

